A friend just received a new Canon A590 IS camera. This is a nice camera with all the basic necessary functionalities of a camera to take great pictures! There is a nice review of it at the Digital Camera Resource Page.
Anyways, my friend asked me about the size of the pictures she e-mails to her daughter. They have always been awfully big. Was there something that can be done? Could there be a setting in the camera to resize the photos?
My recommendation of course was to keep the image quality to "Superfine" to capture as many details as possible and use Windows to make resized copies of the pictures.
Now, I have been using IrfanView to do quick image manipulations and resizing before posting them on websites or e-mailing them out. I was typing away some instructions when I realized that IrfanView was not the right tool. It would frustrate a non-computer user. There has to be a better (turn-key) solution. Doesn't Microsoft have some tools that can integrate into Windows Explorer?
Yes, they do. It's called the Microsoft's Image Resizer Powertoy for Windows XP. After installation, Windows Explorer will sport the option to resize an image. The software has only a few simple options -- choose the size to resize to and away it goes. A batch of picture files can be resized at once so this was the solution I gave my friend. She will be happy with this Powertoy! I know I am.
Sunday, December 28, 2008
How wide are they anyways?
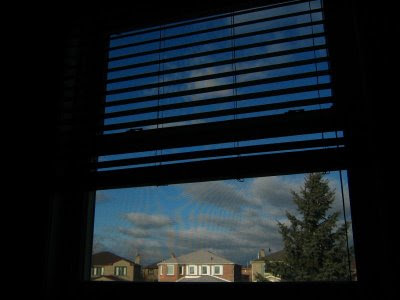
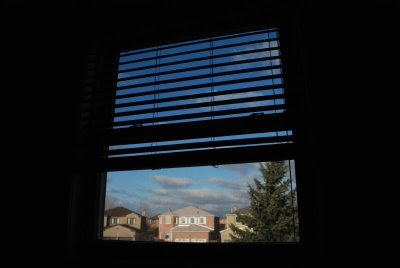
Seeing that the compact camera Canon SD110 was able to shoot at f/2.8 at 5mm, I started to wonder how wide 5mm on a compact really translates to. I cannot imagine how wide the field of view would be through a 5mm SLR lens. So, here is a quick test.
From one place, I shot my window frame. It is clear that the SLR lens at 18mm captures a wider field of view. At the shortest focal length, the 5mm of the tiny lens of the Canon is equivalent to about 24mm or 28mm on an SLR lens.
Canon SD110 at 5mm:
Nikkor 18-200mm at 18mm:
BTW, I did not know how to expose the shot for the outside with the Canon SD110 so I underexposed the shot manually by 2 f-stops to get the blue of the sky. Also, at an equivalent 24mm, the Canon SD110 can shoot at f/2.8 (see the previous post). That is faster than the Nikkor 18-200 f/3.5-5.6 !! :)
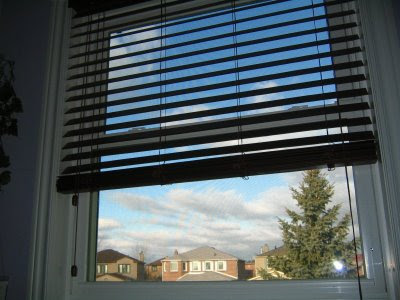
As a side note, if you wanted to shoot the window frame with the blue of the sky, underexpose the shot as I have done and turn on flash. In effect, you are exposing for the sky and use the flash to fill in the foreground. This is from the Canon test shots:
From one place, I shot my window frame. It is clear that the SLR lens at 18mm captures a wider field of view. At the shortest focal length, the 5mm of the tiny lens of the Canon is equivalent to about 24mm or 28mm on an SLR lens.
Canon SD110 at 5mm:

Nikkor 18-200mm at 18mm:

BTW, I did not know how to expose the shot for the outside with the Canon SD110 so I underexposed the shot manually by 2 f-stops to get the blue of the sky. Also, at an equivalent 24mm, the Canon SD110 can shoot at f/2.8 (see the previous post). That is faster than the Nikkor 18-200 f/3.5-5.6 !! :)
As a side note, if you wanted to shoot the window frame with the blue of the sky, underexpose the shot as I have done and turn on flash. In effect, you are exposing for the sky and use the flash to fill in the foreground. This is from the Canon test shots:

Always have a camera on you
 There are days I feel my D80 would be an encumbrance to carry around. On a night into the city for example, I would have more fun if I didn't have to worry about a camera. You should always bring a camera though.
Last night, I left my D80 at home and brought my old Canon SD110 along. The SD110 is a neat camera that fits into a small Lowepro pouch. Use it without flash and some results can be surprisingly good -- the truth though is, I never knew how to use it properly in the past until I started playing with the D80. I have always used it the way it was marketed -- point and shoot. The camera will figure out everything for you -- almost everything.
 So here were a couple of shots I took. The shot outside the bar was untouched. It was fairly sharp (and this was handheld) and a bit noisy, but it turned out quite colourful. The shot was taken in auto mode at 5mm f/2.8 at 1/8 seconds. ISO was auto -- no idea what was actually used.
This bar (not the Rhino lounge above) was quite dark. The original shot was darker than what is shown -- I increased the Gamma values and the contrast a bit. I should have overexposed the shot but being that it is a compact camera, its manual settings
 were not as easy to change and so I did not even think of overexposing the shot then. The shot was taken at 5mm f/2.8 at 1/8 seconds. It would appear then this was the limit of the camera. It increased the aperture to the maximum at f/2.8 and the best it can shoot at was 1/8 seconds.
The bike shot, well, is a little washed out. It had to be taken with flash, but the point was, I would not have been able to capture anything had I left both cameras home. That bike didn't need a chain. It was entombed in snow and ice!
Saturday, December 27, 2008
Sigma 24-70mm f/2.8 MACRO mode, part 3
Well, I have decided that this Sigma is good but it must go. I think my shooting skills need some tweaking. As of now, I still need VR for handheld photography. I will likely put the money towards a good Nikkor f/2.8 VR lens which might give me an equivalent of an f/1, but this is a tricky business. I like the range I get from my 18-200mm and there is f/2.8 equivalent so if I get any f/2.8, it would be a compromise. There is no more candid shots. It would be for a more for indoor shooting and that is that.
Thursday, December 25, 2008
Formatting your SDHC card
Well well well ... this is interesting. As part of the firmware upgrade, I reformatted the HP 8GB SDHC card using Windows XP before putting the firmware images on. After the second image has been loaded into the camera, I left the SDHC card as it was, formatted with Windows XP.
I was doing some test shooting today when I noticed some difference. It would take a new picture a few seconds to be saved to the card. It also takes a few seconds to delete a picture. Did I notice this behaviour before with this HP SDHC? No, I do not remember seeing this behaviour ever before. Maybe the firmware did something funny to the file I/O subsystem of the camera. I then decided to reformat the SDHC using the built-in camera formatting feature. As it turned out, it was not the SDHC. It has something to do with the way the card was formatted. After the card has been reformatted with the camera's formatting software, saving and delete pictures from the card was quick. Either way, the filesystem format is FAT32. I don't have one of the cool Norton Utilities to inspect the SDHC card but there is some difference between the way the D80 formats a card and the way Windows XP does it. In Windows XP, I performed a "Quick Format" but that is probably what the D80 does anyways as it takes no time to format the SDHC card.
Strange.
Merry Xmas!
Batteries, once again
A while ago, I wrote about third-party batteries. I mentioned how unreliable third-party batteries have been. In particular, an EN-EL3e battery I bought worked for only a few rechargeable cycles. What a waste of money. In photography, you get what you pay for. That statement is very true but I wonder if I had not given those batteries their proper dues.
I just found out that Nikon released a new firmware for the D80. I had the original firmware 1.01 on. The latest firmware, version 1.11, was supposed to fix a problem with the battery indicator (see below). I wonder now if my battery problem had not been related to this bug, where even though the third-party battery was full, the D80 thought the battery was drained. My conclusion at the time was, faulty battery. I am not so sure after seeing this firmware update. So, I will recant for now as it might just be a firmware bug. Well, my D80's firmware is up-to-date now. It is unfortunately I cannot test that third-party battery anymore as I had completely dissected it already.
From Nikon's description of the firmware update:
Modifications enabled with upgrade of A and B firmware to 1.11
- An issue that, in some rare circumstances, caused the battery indicator to blink, regardless of actual battery charge, has been resolved.
Monday, December 22, 2008
SDHC speed
Here is a non-scientific test of my SD/SDHC cards. The test was, to write 70MB of a Java folder from the C: drive to the root folder of a memory card connected to a USB2.0 port, disconnect the memory card, reconnect the card, then transfer the Java folder from the memory card back to a temporary folder on the C: drive.
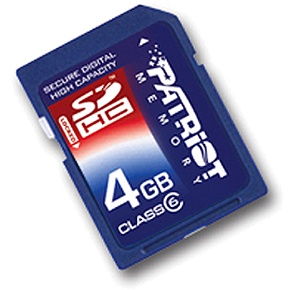 Patriot 4GB SDHC (Class 6)
Writing to the card: 90 seconds
Reading from the card: 30 seconds
HP 8GB SDHC (Class 4)

Writing to the card: 80 seconds
Reading from the card: 28 seconds
Kingston 2GB SD
Writing to the card: 105 seconds
Reading from the card: 26 seconds
Foto Source 1GB SD
Writing to the card: 75 seconds
Reading from the card: 27 seconds
The fastest overall of the bunch is this Foto Source 1GB SD card bundled with the Nikon D80 when I purchased it. It was not really part of the package but the store just threw it in. It's a no name brand. The new 8GB SDHC comes next, followed by my first SDHC card, the 4GB SDHC, and then the Kingston 2GB SD. The 8GB SDHC is a Class 4 SDHC (this Class specifies a minimum speed of 4x, i.e. 4 x 150 kBps or 600 kBps). It performs better than expected at about 1.1 MBps. The Class 6 Patriot 4GB SDHC card is expected to write at a minimum 900kBps. Well, it writes at over 1.2 MBps.
I thought the Kingston 2GB SD was really fast, from what I could see when viewing pictures off the card but when sustained writes are performed, it does not measure up very well. The specs of it are: up to 5 MBps reads and 1.5 MBps writes. It does not appear to perform anywhere close to specs on sustained I/O. Sustained reads and writes took more than twice longer than expected. Very disappointing.
Regardless of the speed, there is absolutely no problems with using any of these SD or SDHC cards in a D80 for continuous shooting. Remember that the D80 has a internal write buffer.
Patriot 4GB SDHC (Class 6)Writing to the card: 90 seconds
Reading from the card: 30 seconds
HP 8GB SDHC (Class 4)
Writing to the card: 80 seconds
Reading from the card: 28 seconds
Kingston 2GB SD
Writing to the card: 105 seconds
Reading from the card: 26 seconds
Foto Source 1GB SD
Writing to the card: 75 seconds
Reading from the card: 27 seconds
The fastest overall of the bunch is this Foto Source 1GB SD card bundled with the Nikon D80 when I purchased it. It was not really part of the package but the store just threw it in. It's a no name brand. The new 8GB SDHC comes next, followed by my first SDHC card, the 4GB SDHC, and then the Kingston 2GB SD. The 8GB SDHC is a Class 4 SDHC (this Class specifies a minimum speed of 4x, i.e. 4 x 150 kBps or 600 kBps). It performs better than expected at about 1.1 MBps. The Class 6 Patriot 4GB SDHC card is expected to write at a minimum 900kBps. Well, it writes at over 1.2 MBps.
I thought the Kingston 2GB SD was really fast, from what I could see when viewing pictures off the card but when sustained writes are performed, it does not measure up very well. The specs of it are: up to 5 MBps reads and 1.5 MBps writes. It does not appear to perform anywhere close to specs on sustained I/O. Sustained reads and writes took more than twice longer than expected. Very disappointing.
Regardless of the speed, there is absolutely no problems with using any of these SD or SDHC cards in a D80 for continuous shooting. Remember that the D80 has a internal write buffer.
Sunday, December 21, 2008
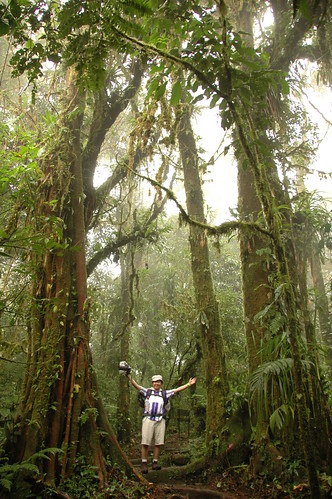
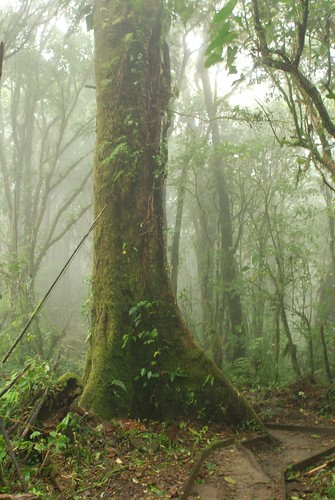
Nikkor 18-200mm in the Cloud Forest
Below are a couple of pictures John shot with his D70s and my Nikkor 18-200mm in the Cloud Forest of Santa Elena. They came out quite sharp. The first was shot at 200mm f/5.6 ISO400 for 1/20 seconds. The second was shot at 18mm f/3.5 ISO400 for 1/80 seconds.
A juvenile centipede crawling on the forest floor:
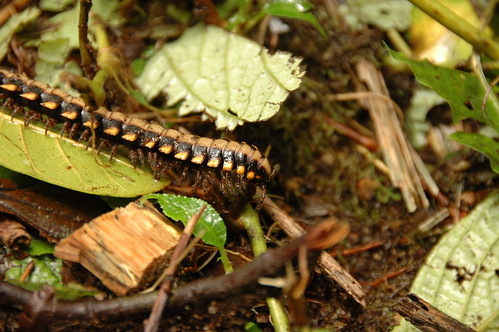
A full 1:1 crop of the centipede:
 Me among the trees -- John has a good eye for composition and perspectives, and it helps that a lens can do 18mm:
A juvenile centipede crawling on the forest floor:
A full 1:1 crop of the centipede:
 Me among the trees -- John has a good eye for composition and perspectives, and it helps that a lens can do 18mm:
Sigma 24-70mm f/2.8 MACRO mode, part 2
 Here are a couple of pictures I took with the extension tube behind the Sigma lens.
I cannot get the "Unlock Computer" screen up anymore than I cannot measure the actual optical field of view width.
The pen tip however is measurable. The upper left corner of the image to the tip of the pen is about 1.1 cm long. The diameter of the field of view is about 1.8 cm, definitely less than 2 cm long. The width of the optical field of view is thus about 1.5 cm. The sensor of the D80 is 2.36cm wide so this is absolutely better than 1:1 magnification!

What I learned from Costa Rica, part 4
This is about traveling with a tripod.
How do you carry your tripod around? Inside your backpack or outside? One way or another, your tripod would have to be stored inside some luggage bag for the flight because it may not be allowed to be carried as a carry-on on the plane. When you get to your destination though, how should you carry it?
In Costa Rica, I read that theft levels are on the increase. It made me uneasy to carry any camera gears on the outside of my backpack. You are just drawing attention to yourself. If they see a tripod, they might think you have more valuables on the inside of the backpack. So, my tripod was stuffed in my 60L backpack, away from prying eyes, most of the time.
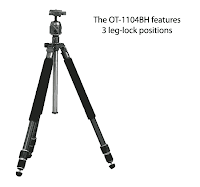 Fully compressed and disassembled (the vertical column can be removed), my OPUS OT-1104BH tripod can fit in virtually any backpack. It's quite small. However, I thought it would be easier to keep the vertical column and the ball head on at all time so I can draw the tripod out of the backpack and use it instantly. My backpack contains my clothes though. It might be easy to draw the tripod out but to re-insert it back into the backpack would be challenging. My solution was to use the box the tripod came in. The box felt bulky but it works really well. The rigid structure of the box reserves space in my backpack so the tripod can easily go in and out of the box whenever I need it.
Two caveats of using the box are: it does take up probably twice as much space as the tripod itself and the double layer of cardboard materials add on more weight. However, the box keeps my clothes and everything else inside the backpack clean and dry from the dirt and sometimes water on the tripod.
How much memory is enough?
I just received an 8GB SDHC card. I was not sure if it would work with the D80. Well, it does! In addition to the current set of cards I have, I now have 17GB of SD/SDHC cards for my camera. I think I will start to record in both high-resolution JPEG and RAW formats. I have spent up a full 8GB over three cards on one vacation trip before so having an additional 8GB will make me even more generous in my shooting. Having said that, I do recognize the need to be more selective and take time to compose my pictures. So, I have 17GB of memory. My friends will not like this.
Sunday, December 14, 2008
Sigma 24-70mm f/2.8 MACRO mode
The Sigma's Macro mode is ok. A real-life ratio of 1:3.8 is not bad, but remember I still have my extension tube? It was used with both the Nikkor 50mm f/1.8 and the Vivitar 70-210mm f/3.5 for macro. The results were good. Well, I decided to run a quick test with the Sigma.
I will post the images later but I could easily magnify better than real-life ratio of 1:1. It sounds really good but the lens has to get really close to the subject, and then light becomes a big issue. My hotshoe speedlight alone might not be tall enough to hit the subject, especially when this lens is 82mm on the far end. I will have to use it as a remote or get some reflectors set up.
I will post the images later but I could easily magnify better than real-life ratio of 1:1. It sounds really good but the lens has to get really close to the subject, and then light becomes a big issue. My hotshoe speedlight alone might not be tall enough to hit the subject, especially when this lens is 82mm on the far end. I will have to use it as a remote or get some reflectors set up.
Friday, December 12, 2008
DSLR recommendation
A friend asked me about buying the Nikon D90. I thought I'd share my view with everyone else here. Here was the e-mail I sent:
I want to buy the D700 but it is $3000, too expensive for my needs.
The D90 would come next. I like its higher ISO performance and image processing.
On a typical day when you take the camera around, indoors and outdoors, I want to be able to shoot without flash. The higher ISO performance would be very welcoming. Compared to my D80, the D90 can shoot twice as fast and still deliver the same image quality. Having said that, sometimes, you have no choice but to use flash, to enhance light conditions and for artistic effects.
Many people will tell you the camera body is not the most important component of the camera system. True, but if the camera can capture better images for the non-professionals (e.g. better auto exposure, cleaner images, more shooting options), the better.
After you pick a camera, the next big question is what lens to use. The answer depends on how and what you want to shoot. For me, I have done:
1) A few macro photography
2) Lots of candid camera shots (need a zoom lens for this)
3) Lots of nature (not birds) shots
4) Few bird shots
5) Few portrait shots
6) Lots of baby / toddlers shots
7) Very few action shots (need a fast, big zoom lens)
Some photographers have a dedicated lens for every situation. Dedicated lens means highest quality for a specific condition. We cannot afford to do the same so I look for a good walkaround zoom lens that will cover a bit of the macro, all of the candid/nature shots, most of the portrait shots, and some of the baby shots. At the same time, I look for a lens that will give me the sharpest picture.
My walkaround Nikkor 18-200mm lens is *ok*. Not the best, even at $950 when I bought it almost two years ago; it is only $650 now. Another option is the Sigma 18-200mm. It is a tad bit slower than the Nikkor but outdoors, there is no difference. Indoors, you will appreciate the 1 extra f-stop the Nikkor gives.
After shooting with the Nikkor 18-200mm for almost two years, I find that I do use all of the range, 18mm all the way to 200mm. What you want to shoot will define the focal range you want:
Portrait: 50-70mm
Landscape: 18mm and lower (as wide as possible)
Family: 18mm-50mm
Birds: 400mm+
Candid: 18-300mm (yeah, 300mm would be great)
Sports: 70-400mm
When looking for a lens, look for one with Vibration Reduction II technology (VR) -- Canon calls it Image Stabilization (IS) and others call it differently yet. It helps with *handheld* shots tremendously. Also, the longer the focal length, the slower the lens becomes -- unless you buy a fixed aperture lens (extremely expensive).
Saturday, December 6, 2008
How reliable is my NAS ?
If you remembered, I built a RAID5 NAS using Slackware Linux 9 to store my photos online at home. I use JAlbum now to create online albums with resampled photos, but the original images stay on my NAS.
Today, I wanted to expand the storage. I had initially allocated 300GB to the logical volume. I have used over 50% of the storage volume already and before I dump anymore on it, I thought I'd expand the volume.
First some background: I have 4 x 320GB SATA drives. I use software RAID to create a RAID-5 partition and used Linux's Logical Volume Manager (LVM) to manage my volumes within the partition. I use the ext3 filesystem to store my files.
To expand the ext3 filesystem, there are three steps:
On to resize2fs. This command is a bit of a memory hog too. It was running for a while from the console until it gobbled up all memory and caused the kernel to panic and hang. Well, that could not be good. Here I had 150GB worth of files and was I about to lose all of it?
I knew I had more RAM somewhere at home so I went to an old machine and yanked out a bar of RAM. With an additional 256MB, my NAS was restarted. I re-executed resize2fs. It took its time ... did not crash ... it took more time ... still not crashing. The signs were good. It completed without any errors. It expanded the 300GB volume to about 600GB.
The ext3 filesystem has shown to me to be quite resilient to operational failure.
Today, I wanted to expand the storage. I had initially allocated 300GB to the logical volume. I have used over 50% of the storage volume already and before I dump anymore on it, I thought I'd expand the volume.
First some background: I have 4 x 320GB SATA drives. I use software RAID to create a RAID-5 partition and used Linux's Logical Volume Manager (LVM) to manage my volumes within the partition. I use the ext3 filesystem to store my files.
To expand the ext3 filesystem, there are three steps:
- Make sure you have space in the RAID Volume Group (VG).
- Use lvextend to extend the logical volume to whatever size that is available from the VG.
- Use resize2fs to resize the ext3 filesystem.
On to resize2fs. This command is a bit of a memory hog too. It was running for a while from the console until it gobbled up all memory and caused the kernel to panic and hang. Well, that could not be good. Here I had 150GB worth of files and was I about to lose all of it?
I knew I had more RAM somewhere at home so I went to an old machine and yanked out a bar of RAM. With an additional 256MB, my NAS was restarted. I re-executed resize2fs. It took its time ... did not crash ... it took more time ... still not crashing. The signs were good. It completed without any errors. It expanded the 300GB volume to about 600GB.
The ext3 filesystem has shown to me to be quite resilient to operational failure.
Friday, November 28, 2008
Second Curtain Sync
Second Curtain Sync. What is this?. My speedlite 430EX manual says you
need to use slow shutter speed and set the flash to second curtain-sync.
You will create a light trail following the subject. The flash fires right
before the shutter closes. I decided to try hitting a piece of my chess
game and here are the results.


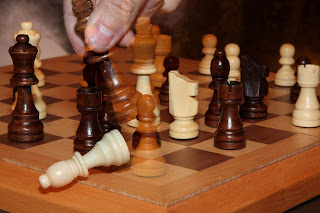
You can see the initial location of the chess piece and the final location after hitting it. another effect of this technique is that my hand and the piece I am using to hit the other piece become trasparent and you can see through them
need to use slow shutter speed and set the flash to second curtain-sync.
You will create a light trail following the subject. The flash fires right
before the shutter closes. I decided to try hitting a piece of my chess
game and here are the results.


You can see the initial location of the chess piece and the final location after hitting it. another effect of this technique is that my hand and the piece I am using to hit the other piece become trasparent and you can see through them
Tuesday, November 25, 2008
What I learned from Costa Rica, part 3
One of my worries in Costa Rica was the humidity. I read that people bought ziploc bags to seal off their camera in their cool and dry A/C room before heading out in the warmer and more humid elements of Costa Rica.
Well, if you travel in November, there is little you have to worry about. In San Jose, we slept comfortably without A/C -- our room did not have A/C actually -- so there is no change in temperature and humidity to worry about. In Santa Elena / Monteverde, we had a fan in the room and again, there was little to worry about there. The air in the Monteverde region is moister than in San Jose but it was not an issue at all for my camera and lens when I stepped out of the room. I did get into trouble in the Cloud Forest though when I realized there were some water droplets on my filter. I blew on the filter to push the water droplet out but all it did was fogging up the filter. In the relatively heavy humidity, once the filter fogs up, it will not defog on its own. I had to pull out a paper napkin to wipe it dry. Hopefully, I did not scratch the coatings of the filter. Anyways, in Montezuma, we had A/C in the room but in the morning when I took my camera out, the outside air was warmer but was relatively dry, so again no problem there. The only time I ran into any fogging problem was in La Fortuna. We had A/C in our room and even at 6am, the outside air was warm and humid enough the filter fogged up a bit. I returned to the room for a few second to defog the filter and went back out. In and out a couple of times, and it seemed all fine.
My D80 is not weather-sealed but in November, Costa Rica was friendly to it. I changed lenses a few times -- on the road to Santa Elena, in the hotel room in Santa Elena, and on the ferry from Puntarenas to Paquera. No problem there. I did buy four ziploc bags. The only time I used one was when I waded and swam the waters of the lower Montezuma waterfall.
Fogging gives a nice effect by the way. Below is a photo taken with a fogged up filter around 6am in La Fortuna. I used flash and a big f value to darken the background. I post-processed it to increase contrast.

Monday, November 24, 2008
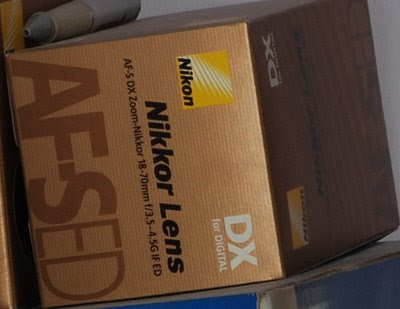
Sigma 24-70mm f/2.8 -- how sharp?
Well, I took a few minutes today to test this lens against the Nikkor 18-200mm VR II. Here are photos of the Nikon lens box I just took 2.5 meters away, handheld, 100% cropped. I used the built-in flash and a shutter speed of 1/60 secs at 70mm. The f/2.8 photo was taken twice ... same softness.
The focus is on the end of the letter 'r' of Nikkor on the Nikon box.
Sigma @ f/2.8:
Sigma @ f/4:

Sigma @ f/5:
Nikkor @ f/5 (maximum aperture at 70mm):
Sigma @ f/8:
The focus is on the end of the letter 'r' of Nikkor on the Nikon box.
Sigma @ f/2.8:

Sigma @ f/4:

Sigma @ f/5:

Nikkor @ f/5 (maximum aperture at 70mm):

Sigma @ f/8:

Saturday, November 22, 2008
What I learned from Costa Rica, part 2
When I was preparing for this trip, I was considering to carry my camera gears in my Lowepro Nova 2 AW camera bag. Unfortunately, the bag is simply too small for everything I wanted to carry. I had to resort to a lightweight backpack and used old lint-free sweaters to pad the content of the backpack. It worked well. The backpack has wide shoulder straps so carrying my camera gears around was easy. I got the backpack from the Becel Ride for Heart for raising a certain amount of donations. It was a simple, lightweight backpack. It is not meant for camera gears but because the nylon bag fabric is waterproof (except for the zipper line) I decided to use it for my trip. Thinking back now, I probably should have used something else.
What I need for traveling with my camera gears is a waterproof backpack with flaps covering the zippers. If I carry the backpack on my back, it is possible for some thief to unconspicuously unzipper the bag and remove its contents in some busy foot traffic though. Therefore, it would be necessary to lock the zippers to deter theft. However, locking the zippers means unlocking them before use -- too inconvenient. It would nice if the zippers face your back then. This way, it would be extremely hard for the common thief to unzipper the bag let alone see the zipper.
Is there such a bag out there?
Tuesday, November 18, 2008
What I learned from Costa Rica
I had in my backpack:
I took the 80-400mm lens out only once to test it from a hotel balcony. I should have brought it to the Arenal volcano trip because there were some lava hot boulders tumbling down the side of the volcano, and because there was a Toucan in the far distance that could only be shot with the 400mm!!
The speedlight was useful. I used it many times. I also went through the camera batteries like running water, but I did not have to resort to the 5xAA backup batteries for the flash unit.
So, my backpack would have been a lot more comfortable (by 2.5kg) if I had left the tripod, the 80-400mm lens, and the extra 5xAA batteries home. For my next trip, should I or should I not bring the tripod, the Tokina lens, and the extra batteries? These three heavy gears tend to fall under the only-if's situations. Only if I had brought the 80-400mm to the volcano ... but I didn't because it was darn heavy and I did not expect to see a Toucan there!
- 1.5kg tripod
- 1.05kg Tokina 80-400mm lens
- 0.585kg D80
- 0.560kg Nikkor 18-200mm
- the 0.350kg speedlight flash
- the vertical battery grip
- the original Nikon battery
- 10 x AA batteries (for the flash)
- AA recharger
- camera batter rechargers
- and other miscellaneous camera stuff
I took the 80-400mm lens out only once to test it from a hotel balcony. I should have brought it to the Arenal volcano trip because there were some lava hot boulders tumbling down the side of the volcano, and because there was a Toucan in the far distance that could only be shot with the 400mm!!
The speedlight was useful. I used it many times. I also went through the camera batteries like running water, but I did not have to resort to the 5xAA backup batteries for the flash unit.
So, my backpack would have been a lot more comfortable (by 2.5kg) if I had left the tripod, the 80-400mm lens, and the extra 5xAA batteries home. For my next trip, should I or should I not bring the tripod, the Tokina lens, and the extra batteries? These three heavy gears tend to fall under the only-if's situations. Only if I had brought the 80-400mm to the volcano ... but I didn't because it was darn heavy and I did not expect to see a Toucan there!
Santa Elena Cloud Forest, part 2
 Here is another shot with the Sigma 24-70mm f/2.8 in the Santa Elena Cloud forest.
Handheld, I propped against the railing of a wooden bridge. John and Andrew were on the bridge but soon, Andrew would get off it. The platform on the bridge became more stable. I took a breath and as I exhaled, depressed the shutter release button. I shot a couple of times. Both pictures turned out really good, even when shot at f/16 for 1.5 seconds.
Santa Elena Cloud Forest
 I decided to switch my Nikkor 18-200mm with the Sigma 24-70mm with John on the way to Santa Elena / Monteverde. Most of my shots with the Sigma was sharp even in the Cloud Forests so I am happy with this lens.
They don't call them Cloud Forests for nothing. We were right in the middle of clouds so the air was misty and moist, everywhere. Without a hat, your hair would be totally wet. Without a jacket, your t-shirt would be equally wet. However, I could care less as it became intensely hot after 30 minutes of hiking in relative coolness of the shaded forest. I removed my jacket but kept my hat on, and hiked in shorts and a shirt.
I wonder how the pictures would turn out had I used the Nikkor ... gotta wait for John's pictures.
Monday, November 17, 2008
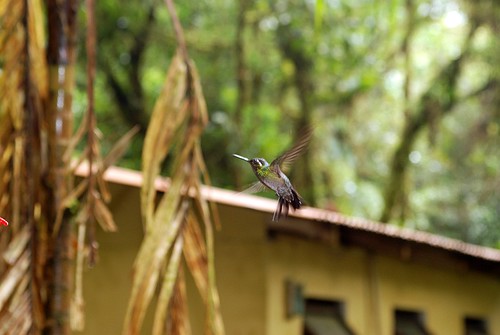
Sigma 24-70mm f/2.8
I met up with John who picked up my Sigma lens in Boston, on the way to Costa Rica. I finally saw the lens a couple of weeks after I purchased it. The wait was worth it. I like this lens. It is fast, and on a moving bus, VR does not matter -- speed matters. I shot quite a few photos from a moving bus on rough terrains so the speed was quite welcoming. It was also good in the lower light conditions of the Cloud Forests. However, when handheld in the morning light on stable ground, my Nikkor 18-200mm VR II will beat this Sigma 2.8 lens hands down.
Here is a photo I took of a hummingbird in flight. I think the 18-200mm would have done a better job but this shot with the Sigma is not bad. The settings were 70mm, f5.6, ISO400, flash on.
Here is a photo I took of a hummingbird in flight. I think the 18-200mm would have done a better job but this shot with the Sigma is not bad. The settings were 70mm, f5.6, ISO400, flash on.
Sunday, November 16, 2008
Camera hand grip, part 3
The ultimate test came from the trip to Costa Rica. The hand grip is a must for anyone hiking or walking about photographing people or nature for hours. I no longer had the fear that the camera would slip off my hand or my shoulder when carrying it around. Plus, I felt much safer that someone cannot easily snatch the camera right off my hand.
There are only two issues with the hand grip I bought though. First, it is not porous enough you'd sweat in it in a subtropical environment. Second, the tripod mount point is not flush with the base of the grip so the tripod quick release cannot be screwed on firmly.
Anyways, thumbs up for the hand grip.
Tuesday, November 4, 2008
Camera hand grip, part 2
Well, it arrived today. It looks ok. It's a simple design with leather on the outside and some nylon fabric inside. There are two straps, one for securing the hand grip to the camera and another for your thumb to pull the hand grip in.
Setup was simple. It came with some drawn instructions. However, I was hoping I could loop the hand grip strap through the same ring that the Nikon neck strap is looped through but they are too thick together. I had to move the Nikon neck strap to the ring of the hand grip.
Overall, I don't like the strap configuration. The second strap that your thumb feeds through lies between the back of your hand and the nylon material. It is a bit irritating that I can feel the strap so I rerouted the strap so it runs between the leather and the nylon fabric.
So, it arrived before my trip so Costa Rica will be a good test of this hand grip. I hope my camera does not attract too much attention ... given that the purpose of this hand grip is to allow me to hold it for a longer duration without getting stiff hands.
Monday, November 3, 2008
EXIF info in Firefox
I am always curious how photos were taken -- what settings were used ... ISO, aperture, speed, WB, etc. Flickr can show properties of an image but what about other services and other random images posted on the Internet? I use Firefox most of the time and I just came across this one neat tool for reading image EXIF online with Firefox:
http://ted.mielczarek.org/code/mozilla/fxif/
Give it a try. No longer do I need to download an image and load it in Irfanview or Gimp to view camera information embedded in an online image!
Oh, I just realized there are many other EXIF readers for Firefox ... you should run a Google search on "firefox exif".
Sunday, November 2, 2008
Flash, again, part 2
I forgot to include the bounce card in my test. Well, I needed to reshoot my control.
Natural light:
Speedlight pointing toward the popcorn ceiling:
Speedlight pointing toward the popcorn ceiling, with a white bounce card:
Speedlight pointing toward the popcorn ceiling, with a white bounce card with a one-inch vertical black strip:
Natural light:

Speedlight pointing toward the popcorn ceiling:

Speedlight pointing toward the popcorn ceiling, with a white bounce card:

Speedlight pointing toward the popcorn ceiling, with a white bounce card with a one-inch vertical black strip:

Flash, again
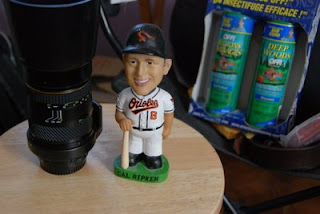
I needed to do some comparisons again to remind myself of what settings and what orientation works best when using the built-in and the hotshoe speedlight flash in combination with the dome diffuser.
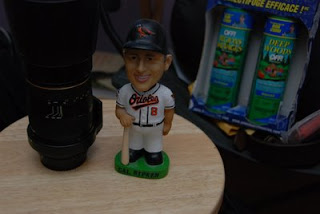
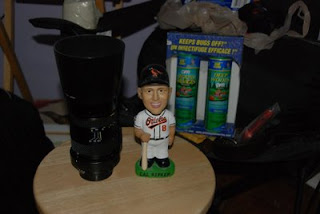
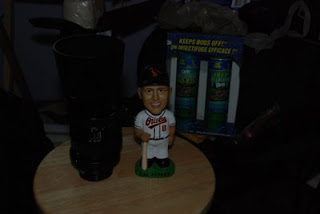
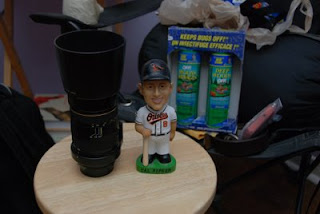
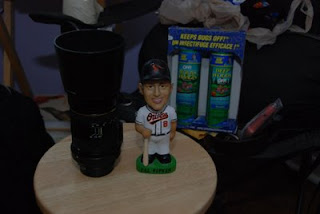
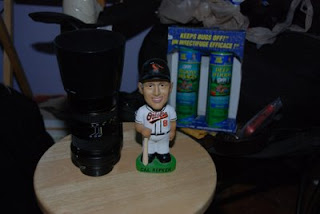
Here is Cal Ripken, my bobble head, in natural light. (There was not much light outside this morning and my blinds were half open.) Everything looks as I see it with my eyes.
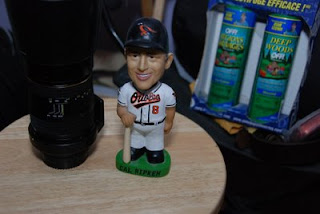
Built-in flash:
Built-in flash, with a diffusion dome held in front of it:
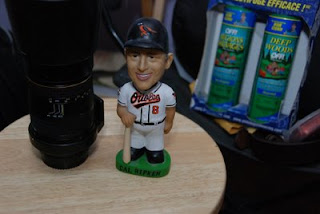
Speedlight, pointing toward my popcorn ceiling:
Speedlight with the diffusion dome, pointing toward the popcorn ceiling:
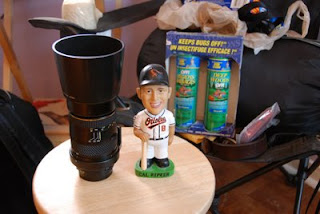
Speedlight, pointing directly at Cal.
Speedlight with the diffusion dome, pointing directly at Cal.
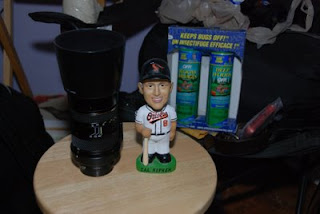
You might wonder what all the crap is behind Cal. Those of some of my camping gears that I will be taking with me to Costa Rica. The lens beside Cal is the Tokina AT-X 80-400mm.
Also, notice that I have popcorn ceiling so light does not bounce back as uniformly as if I had a flat ceiling.
Here is Cal Ripken, my bobble head, in natural light. (There was not much light outside this morning and my blinds were half open.) Everything looks as I see it with my eyes.

Built-in flash:

Built-in flash, with a diffusion dome held in front of it:

Speedlight, pointing toward my popcorn ceiling:

Speedlight with the diffusion dome, pointing toward the popcorn ceiling:

Speedlight, pointing directly at Cal.

Speedlight with the diffusion dome, pointing directly at Cal.

You might wonder what all the crap is behind Cal. Those of some of my camping gears that I will be taking with me to Costa Rica. The lens beside Cal is the Tokina AT-X 80-400mm.
Also, notice that I have popcorn ceiling so light does not bounce back as uniformly as if I had a flat ceiling.
Saturday, November 1, 2008
My Nikkor 50mm f/1.8
Well, as of today, the Nikkor 50mm f/1.8 is no longer in my possession. It is in the good hands of a student. I hope he can make good use of it, and will very likely, as that is going to be his only lens.
Now, I am down to four lenses -- my trusty walkaround Nikkor 18-200mm f/3.5-5.6 VR II, my super-zoom Tokina 80-400mm f/4.5, my new super fast Sigma 24-70mm f/2.8, and an old Nikkor 500mm f/8.
Now, I am down to four lenses -- my trusty walkaround Nikkor 18-200mm f/3.5-5.6 VR II, my super-zoom Tokina 80-400mm f/4.5, my new super fast Sigma 24-70mm f/2.8, and an old Nikkor 500mm f/8.
Friday, October 31, 2008
Macro photography, part 2
Well, as you know I have bought a Sigma 24-70mm + Macro. Since I rarely shoot with my 50mm f/1.8 I have decided to let it go too. For macro photography, I think I will pleasantly be surprised with the macro capability of the Sigma lens in front of an extension tube. The Tokina 80-400mm can do wonderful macro already with the extension tube so I expect the Sigma to perform very well in macro mode.
The 50mm is on its way out. I do not miss the f/1.8 as I do not find myself using it often enough. I might pick it up again at a later time.
The wasp ... my subject. I closed my windows for a few days as the wasp refused to get out. Well, the wasp is gone ... disappeared. It is not laying dead in my window frame. It disappeared. My macro subject is gone.
Camera hand grip

I just bought this camera hand grip from eBay. I am impatiently waiting for it to arrive before I have to fly out of here to Costa Rica. I think this is a neat invention as I often find my hand getting fairly stiff after holding the camera up for 30 minutes or longer. I have done this at weddings. It was tough.
Hopefully this will work!
Wednesday, October 22, 2008
Vivitar 70-210mm f3.5
Well, I will miss this lens. I just let it go today with the 2x teleconverter. A beautiful lens. An art of optics.
Meanwhile, I decided to purchased the Sigma 24-70mm f2.8 anyway as I am going to Costa Rica soon. That and my 18-200mm will be fighting for the walk-around lens title. I am worried about humidity.
Meanwhile, I decided to purchased the Sigma 24-70mm f2.8 anyway as I am going to Costa Rica soon. That and my 18-200mm will be fighting for the walk-around lens title. I am worried about humidity.
Monday, October 20, 2008
Constant aperture zoom lens
Recently, I ran into a sale of a Sigma 24-70mm f2.8 lens. I was very tempted to buy it but upon reviewing other people's experience with the lens, I was left a little confused. Many people claim that at the widest aperture, images are a little soft -- which is true of virtually every lens out there. They claim that you really need to shoot at f4 to f16 to get tack sharp pictures.
So, what does that mean then? I want to buy a fast lens but I have to stop it down if I want sharp pictures. How is that better than my Nikkor 18-200mm f3.5-5.6 VRII? With VRII, I can gain 2 f-stops. So, I guess before I buy it, I need to get my hand on a test lens or someone can do a comparison between these lenses.
So, what does that mean then? I want to buy a fast lens but I have to stop it down if I want sharp pictures. How is that better than my Nikkor 18-200mm f3.5-5.6 VRII? With VRII, I can gain 2 f-stops. So, I guess before I buy it, I need to get my hand on a test lens or someone can do a comparison between these lenses.
Sunday, October 12, 2008
Macro photography
 Well, I was not planning to do any shooting today although the idea of another hiking trip was very appealing in this 25C temperature, but a buzzing noise was hovering over to my right in my bedroom. The last time I heard that buzzing was from a wasp that managed its way into my room a few weeks ago. I wondered where it came from. Well, today, I see two of them. I think there is a hole in my new window frame and their nest is somewhere close, very close.
Anyways, I decided to test the macro capability of my Vivitar
 70-210mm. Alone, it can produce 1:2.2 real life ratio. Added the 2x teleconverter I have, I can whip up a near real life macro shot, at 1:1.1. I took a few shots of the wasp but I had set the shutter speed too slow at 1/10 secs so the pictures turned out a little blurry. I did however get a couple of shots at 1/320 secs. I also tested my 50mm lens with one 50mm extension tube to take a few shots of the wasp.
 The first four shots are from the Nikkor 50mm. The last two on the right are from the Vivitar 70-210mm. The original photos have been resized to 1024x685 but they are not cropped so what we see here is what filled the sensor screen. With either lens, you have to get to about 10 cm of the subject. It was a little unnerving to get so close to a wasp (as I had been stung once) but this one was very gentle.
For these shots, I had to use the external speedlight set on Manual
 mode as the built-in flash is too low -- the Vivitar lens is almost a foot long. In Manual mode, the speedlight does not talk with the camera so it was a little painful trying to figure out the right setting without a light meter. I wish I had a D300 or one of the other professional DSLRs that can meter with the manual lenses. I had to take a few shots and adjusting power output level of the fash, before getting the right exposure.
The lens aperture was set between f/8 and f/22. The speedlight
 was set somewhere between 1/128 to 1/1 depending on the shutter speed I used.
For most of the shots at f/16 or f/22, the power output from the flash was set to 1/1. I just cannot remember which photos were shot at minimum aperture but the last two photos were shot at f/16.
So, which lens do I prefer for macro photography? I have to say, the old 1975 Vivitar lens was easier to use. At whatever aperture I dialed, you could still view the subject clearly in the viewfinder -- the Vivitar lens is a bigger, wider lens than the 50mm so
 at f/22 the Vivitar aperture is the same size as the Nikkor 50mm lens at f/8. That is, the Vivitar can gather a vast amount of light even at f/22. With the Nikkor 50mm, without background light, it may be impossible to see what you are shooting. So, for this reason, I prefer the Vivitar and while I had the intention to sell it because I hardly ever used it, I will keep it for macro photography now.
Monday, October 6, 2008
Fighting the temptation
I think photography is evil. I saw this Sigma 18-50mm f2.8 EX DC lens that someone in the area wanted to sell for $325. My first thought was, wow! I gotta get this lens. I have read some good reviews about this lens and a couple bad ones. This lens was praised for being fast and sharp. I was so tempted to buy it as I am planning a trip to Costa Rica. Such a lens would be very nice for the thick canopy of the rainforest. However, it took me a few hours to realize that unless I use a D700 or D3 with an f1.8 lens, there is not much I can do about the light conditions under the canopy. I will have to resort to a hotshoe flash to capture things within 13 metres from me. Besides, I already own a Nikkor 50mm f1.8 prime lens, over a full stop faster than the Sigma lens. My Nikkor 18-200mm f3.5-5.6 is only half a stop slower than the f2.8 and with VR, it should outperform the Sigma from 18-50mm, so I should after all be content with my set of glasses. I have to keep my excitement under control or I will end up spending thousands of dollars on gears that are simply redundant.
Friday, September 26, 2008
Defect / Dead Pixels on the sensor
Well, the dead pixels are back. On the Nikon website, they call these pixels 'defect pixels'. They have a description of the pixel. These pixels may not be seen in every photo you take if the shutter speed is lower than 1/2 seconds because of the Noise Reduction (NR) feature. However, in daylight and at faster, normal speed, these pixels will show up as white dots. These are a pixel-big dot, not a blurry blotch like a dust spot -- just one pixel. The exact reason is not clear but Nikon says environment factors could cause dead pixels to appear. I guess that means that exposure to perhaps humidity and heat can damage parts of the sensor. The one solution they have is to re-calibrate the camera. I can only guess what that means -- fixing the problem by intrapolating the value of the dead pixel by using the neighbouring pixels. Well, I have four dead pixels. Four pixels out of 10+ millions. You can barely notice them but since I know where they are, my eyes are drawn to them now. I need to check my warranty card and take the D80 in for repair. I wish there was a way to re-calibrate the camera myself
Thursday, September 25, 2008
Polarizing Filter, part 5
In my last post about the circular polarizer, I showed how the polarizer cut into the corner of the frame at 18mm. I should have qualified that observation with the fact that the polarizer was placed in front of a Neutral Density filter. At 18mm, not much can be added in front of the lens. A wall of maybe half a centimetre is about the maximum. Below is an 18mm shot with just the polarizer on -- the ND filter and the petal are on the table. The darkened corners are gone.

Sunday, September 21, 2008
D80 and SB-800 high speed flash sync
This modern piece of electronics is sure packed with a ton of features. Add a hot shoe flash and the feature set just got expanded by another 50 different options, or maybe more.
When the SB-800 was shoed on the D80 in the Aperture Priority shooting mode, I noticed that the shutter speed was always at a constant 1/60 seconds regardless of what aperture setting I dialed. Could there not be a way to increase the shutter speed? There is.
Last night, my mind got really curious. I could not understand why I could not shoot faster than 1/60 seconds with flash. 1/60 seconds is fast and the flash would freeze your subject but 1/60 seconds is still slow if your subject is a fluttering hummingbird. Well, I did some testing and so far this is what I found out.
First, the maximum flash sync speed, which is the fastest shutter speed possible where the whole sensor is exposed to light, of the D80 is 1/200 seconds. That speed is how fast a Focal Plane shutter curtain can move across the sensor surface. Faster than this shutter speed, the two shutter curtains will move in tandem with a small gap equal to the shutter speed between them. Without the SB-800 speedlight, the fastest shutter speed when flash is used is 1/200 seconds.
With the built-in flash, in Aperture Priority mode, for some reason I cannot understand yet, the fastest shutter speed is 1/60 seconds. In Manual and Shutter Speed Priority modes, the fastest speed can be set to 1/200 seconds. So, if you want to shoot at speeds faster than 1/60 seconds with the built-in flash, you need to switch over to Manual or Shutter Speed Priority.
With the SB-800, it is possible to go beyond the 1/200 seconds limit. On the Nikon D80, Custom Menu item #25 is called 'Auto FP'. FP stands for Focal Plane, referring to the Focal Plane shutter curtains. Auto FP should be turned on to enable automatic High Speed Sync between the D80 shutter and the SB-800. This will allow the camera to shoot at speeds up to 1/4000. For an explanation of how the Focal Plane shutter works, I highly recommend this article by Derek K. Miller (the best explanation, albeit a little long, of how the shutter curtains work I have read so far) and this video of the Nikon D3 shutter.
Once you have turned on 'Auto FP', it is still not possible to use speeds faster than 1/60 seconds in Aperture Priority mode. You need to switch over to Manual or Shutter Speed Priority to crank the shutter speed all the way to 1/4000 seconds. This is very cool but I wonder if it is any useful. The fact is, at speeds past the maximum sync speed, say 1/500 seconds, the second Focal Plane shutter curtain trails the first curtain by 1/500 seconds, i.e. exposing the sensor to light by a slit that lasts only that much time. When the flash pops (not a single flash but multiple flashes, i.e. strobes) the sensor is exposed to the reflected light through a moving slit. The slit moves down the sensor surface in 1/200 seconds. I wonder if shooting a fluttering hummingbird at a shutter speed of 1/500 this way is better (strobing light) than simply keeping the shutter speed within the maximum flash sync range (one flash pop).
Saturday, September 20, 2008
Vivitar 70-210mm f3.5
My Series 1 Vivitar 70-210mm f3.5 FX lens has been sitting on the sideline ever since I acquired the 80-400mm Tokina. The truth is, it is heavy (weighting a whopping 0.879 kg) and it is manual focus. I ended up using a lighter and easier lens for telezoom shots.
Today, I got curious about flash and the manual lenses. I wondered how I could use flash with a manual focus lens. Whenever I trie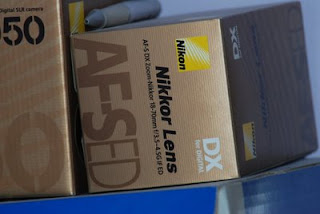 d an MF lens, the flash icon on my LCD would blink, telling me it cannot activate the built-in flash. Well, today, I decided to shoe in my SB-800 speedlight, as I know it can be operated in manual mode. In manual mode, you set the output strength and the flash fires when the shutter opens. Simple operation. I then got curious. Can my D80 set the built-in flash to manual mode as well? I kicked myself in the butt after looking up the menu. Truth be told, my memory is getting rusty because I have looked at this menu before. The option to turn on manual mode is there, I just forgot about it. So now I could simply use the built-in flash in many situations with MF lenses. I am getting off tangent ...
So, I wanted to test my Vivitar lens again because I forgot how good or bad it was. The lens is still in perfect condition. The lens bod y is made out of real metal, hence its weight, unlike most of the new plastic lenses made today. The body feels cold because of the metal and the glass looks pristine clean. In my room, I took a few shots with it with manual flash at ISO200, 210mm, f/9. I must say I am impressed with what a piece of 1975 techno craft can do. The image came out nearly task sharp. You sharpen it up a little in Photoshop (or Irfanview what I use) and the image is crystal clear.
The first image is from the Vivitar, image resized to 1024x685. It is shot of a set of boxes of a D50 and Nikkor AF-S 18-70mm lens that my older brother bought a few years ago. The second image is a crop at maximum resolution from the original 3872x2592 JPEG image. The images look very clean and sharp.
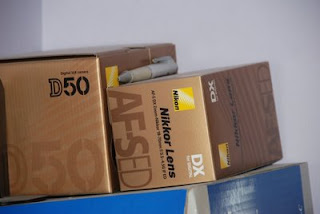
The third image is from my Nikkor 18-200mm DX lens. It was shot at ISO200, 200mm, f/5.6 with the built-in flash set to TTL. As far as image quality is concerend, there is no difference that I can see between this shot and the Vivitar shot. There is one thing to notice here though. At 210mm, the FX Vivitar looks more like a 300mm DX lens.
The fourth image is a crop at maximum resolution of the Nikon shot. The crop is slightly different. The Vivitar crop is sharp but has more noise than the Nikkor crop. However, it is probably due to lower flash output than the Nikkor TTL shot.

The Vivitar lens is a really nice and sharp lens. It is a legacy lens manufactured by Kiron for Vivitar back in 1975. I like this classic of classics. I want to sell the Vivitar lens though so I can put the money toward a better lens. Perhaps I will take it out a few times first. It will be sad to see it go, if anyone will still want to buy this piece of art.
Today, I got curious about flash and the manual lenses. I wondered how I could use flash with a manual focus lens. Whenever I trie
 d an MF lens, the flash icon on my LCD would blink, telling me it cannot activate the built-in flash. Well, today, I decided to shoe in my SB-800 speedlight, as I know it can be operated in manual mode. In manual mode, you set the output strength and the flash fires when the shutter opens. Simple operation. I then got curious. Can my D80 set the built-in flash to manual mode as well? I kicked myself in the butt after looking up the menu. Truth be told, my memory is getting rusty because I have looked at this menu before. The option to turn on manual mode is there, I just forgot about it. So now I could simply use the built-in flash in many situations with MF lenses. I am getting off tangent ...
So, I wanted to test my Vivitar lens again because I forgot how good or bad it was. The lens is still in perfect condition. The lens bod
 y is made out of real metal, hence its weight, unlike most of the new plastic lenses made today. The body feels cold because of the metal and the glass looks pristine clean. In my room, I took a few shots with it with manual flash at ISO200, 210mm, f/9. I must say I am impressed with what a piece of 1975 techno craft can do. The image came out nearly task sharp. You sharpen it up a little in Photoshop (or Irfanview what I use) and the image is crystal clear.
The first image is from the Vivitar, image resized to 1024x685. It is shot of a set of boxes of a D50 and Nikkor AF-S 18-70mm lens that my older brother bought a few years ago. The second image is a crop at maximum resolution from the original 3872x2592 JPEG image. The images look very clean and sharp.

The third image is from my Nikkor 18-200mm DX lens. It was shot at ISO200, 200mm, f/5.6 with the built-in flash set to TTL. As far as image quality is concerend, there is no difference that I can see between this shot and the Vivitar shot. There is one thing to notice here though. At 210mm, the FX Vivitar looks more like a 300mm DX lens.
The fourth image is a crop at maximum resolution of the Nikon shot. The crop is slightly different. The Vivitar crop is sharp but has more noise than the Nikkor crop. However, it is probably due to lower flash output than the Nikkor TTL shot.

The Vivitar lens is a really nice and sharp lens. It is a legacy lens manufactured by Kiron for Vivitar back in 1975. I like this classic of classics. I want to sell the Vivitar lens though so I can put the money toward a better lens. Perhaps I will take it out a few times first. It will be sad to see it go, if anyone will still want to buy this piece of art.
Subscribe to:
Posts (Atom)
Invasion of What?
What are these bugs? I've never seen them before. I saw them at my parents' place the other day. Lots of them in soil or grassy areas.

-
 What are these bugs? I've never seen them before. I saw them at my parents' place the other day. Lots of them in soil or grassy areas.
 -
 This shot was taken with the D7200 from inside my car. I had to pull over quickly and I didn't have time to think about the settings. I ...
 -
A local Zellers store is having liquidation sales of everything in the store. I was browsing through some electronics the other day--not pl...