Sunday, January 29, 2012

Triggering the D7000

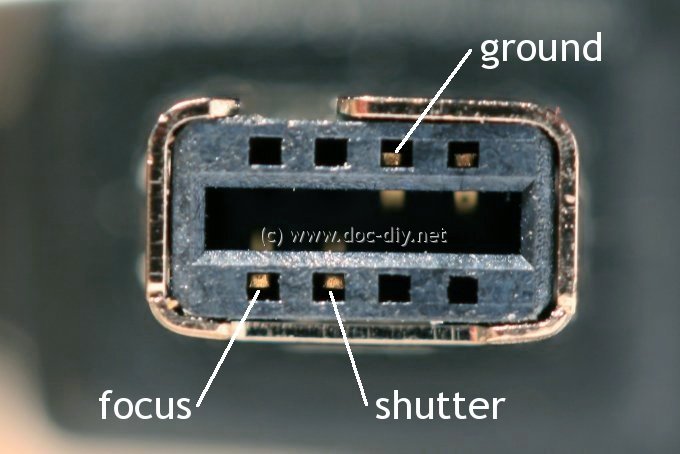
The reason I took out the Solmeta GPS unit last night was because I needed a way to remote release the D7000 shutter.  I thought the D7000 came with a PC Sync port like the D300.  It does not.  Instead of the PC Sync port, there is a special GPS port (see below).  The good thing with the Solmeta GPS unit is that it has a pass-through remote trigger 2.5mm stereo jack.  For my DIY, I just needed to build a cable with a 2.5mm stereo connector that goes from my laser/sound/lightning trigger circuit to the 2.5mm stereo jack.

Left side of Solmeta GPS N1 with 2.5mm jack and special USB port.

The D7000 / D90 GPS connector:

http://www.doc-diy.net/photo/remote_pinout/d90_pinout.jpg
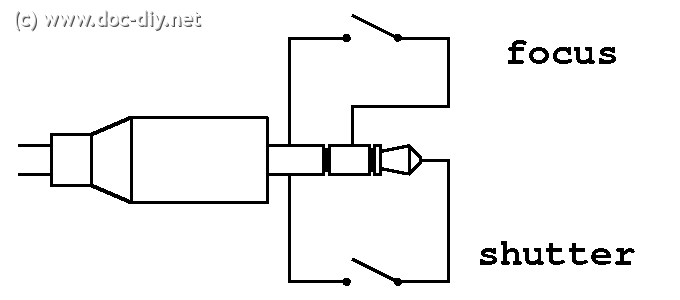
The 2.5mm stereo connector to connect to the Solmeta has the same pin-out as the Canon plug except that to trigger the shutter, it is not sufficient to connect the tip (shutter) to the sleeve (ground).  To actually trigger the shutter on the D7000, I had to connect the ring (focus) to the sleeve (ground) first, then join the tip (shutter) to the pair.

http://www.doc-diy.net/photo/remote_pinout/canon_pinout.png
I fashioned a cable with a 2.5mm plug end from an old earphone.  I cut one end of the earphone, soldered three wires to it, and taped it together:

2.5mm connector with the Solmeta GPS N1.

Below is how I would connect to a lightning trigger circuit.  The three wires are isolated from one another until the OptoIsolator is activated.  This circuit is based on the laser trigger circuit with the resistor-capacitor components removed and switching the PhotoResistor and the 62 KOhm resistor around ... and ORgate1 should probably be removed.  The lightning trigger circuit activates the camera shutter when the PhotoResistor senses the flash from a lightning bolt.

Lightning trigger circuit


Reference:  The pin-out diagrams of the GPS plugs came from http://www.doc-diy.net/photo/remote_pinout/

Problems with Solmeta GPS N1 for D7000

It has been eight months since I last used the Solmeta GPS N1 unit.  I thought I did something wrong back then, but I don't think so now.  The unit is fairly simple to use.  You just plug in the provided USB cable and power on the GPS unit to start receiving GPS signals.  In my test last night, I did not even power on the GPS unit and yet, after a few shots, three things failed to work on my D7000:

  1. Half-pressing the shutter button to focus actually triggers the shutter.
  2. Sometimes, the shutter release button stops working.
  3. The Play button to review photos taken stops working.
  4. The Menu button stops working.
The only way to restore functionality to the D7000 is to disconnect the USB cable.

Having observed the behaviour of the SB-25 flash gun when it is triggered with a PC Sync cable, I have a feeling that some wires inside the Solmeta unit get shorted (to activate the camera shutter) and not released.  To trigger the SB-25 flash gun to fire off, the two wires of the PC Sync cable just need to be connected together.  The SB-25 flash gun will fire off once.  If the two wires stay connected together, the flash gun will freeze up, i.e. the menu and function buttons will stop working.  A very similar behaviour is noticed here with the D7000 and the Solmeta unit.  I wonder if the trigger wires got shorted and not released, electronically.

I should have done this test last July when I bought the unit.  Well, it is still under warranty so I just e-mailed service[at]solmeta.com for support.  Let's see what they say.

Saturday, January 28, 2012

Sound trigger for high speed flash photography, part 8

Another balloon pop.  I had the idea of popping it from the top.  The result looks like a cup.  For this capture, the balloon is positioned about 50cm from the microphone.  Flash output was set to 1/64.

Turqoise balloon pop.  Flash power set at 1/64.

Here is a shot of a yellow balloon popped from the bottom.  I was hoping to see something more interesting, like the shape of a parachute.  It still looks interesting with the ripples close to the edges.

Yellow balloon pop.  Flash output set at 1/64.


I had by mistake left the output power of the flash set at 100% on an earlier shot with a white balloon.  Flash output set at 100% lasts much longer than flash set to 1/64, but I don't understand the result.  Because the flash light lasts longer, one can see a ghostly shape of another balloon, but it does not explain why the balloon looks like it has not been popped.  My first attempt with a white balloon a few days ago also resulted in a shot of a full balloon.  I wonder if the white balloons collapse much slower than the colored balloons.  Strange.

White balloon pop.  Flash output set at 100%.

Friday, January 27, 2012

Lightning trigger circuit

Toronto does not get much lightning and when we do, I rarely see them.  A few years ago, I did capture two lightning bolts through the window of my second story bedroom.  It was great.  I simply left the shutter open for 10 seconds at a time and I was lucky enough to catch two strikes.

Now that I have built the laser trigger circuit, I think my next attempt to capture lightning will depend less on luck and more on technology.  I can modify the circuit by switching the PhotoResistor and the 62 KOhm resistor around, and remove the DelayCapacitor for an instant trigger.  The circuit would be connected to the PC Sync port of a camera instead of the flash gun.  I tested the new circuit under normal room lighting by running an LED flash light quickly across the photoresistor.  The flash light was strong enough to trigger the circuit.

We are in the middle of a warm and wet winter.  Maybe there is a tiny small chance of a lightning storm?

Laser trigger circuit.  Switching the 62 KOhm resistor and the PhotoResistor around, and removing the DelayCapacitor should turn this circuit into a lightning detector, I hope.


Wednesday, January 25, 2012

Sound trigger for high speed flash photography, part 7

I finally decided to draw the circuit I used for the sound trigger with the QUCS software.  Not all components are available in QUCS so I had to draw a couple of items in the schematic diagram.  These items have no electrical properties so simulation in QUCS does not work as is.

Note that the LM324 OpAmp is connected up with five pins instead of three as shown.  Pin 3 = positive input (reference signal), pin 2 = negative feedback, pin 1 = output, pin 4 = 5V input, pin 11 = ground.

Sound trigger circuit.  The capacitor polarity can be reversed?

Note also that the capacitor is a polarized capacitor, and the potentiometer is there to adjust the sensitivity of the circuit to sound.

Sound trigger for high speed flash photography, part 6

So, my hypothesis that sound traveled too slow was probably correct.  I decided to waste two more balloons tonight.  My first attempt was with a white balloon.

Notice in the first photo that the electret microphone was just about 20-25cm away from the balloon.  Here, when I popped the balloon, the flash gun fired off so quick that the shape of the balloon remained as a balloon.  I did make a mistake of puncturing the balloon from the backside.  It is possible that the rupture has opened a wide gaping hole that cannot be seen from this angle.

On my second attempt with a green balloon, it was more impressive.  It can clearly be seen that half of the balloon went missing.  This time around, I held the balloon a little further away from the microphone, about 40cm or so.  Half of the balloon was gone but it is also clear that the other half retained the shape of the balloon.  That is cool.

I think I need a couple of flash guns, or at least, I need to use a reflector to get more light on the right side of the balloon.

Well, this has been a good test.  Now, I know for sure the circuit is fast enough to capture a popping balloon.  I just need to play a bit with the light now.

I have a wild idea of shooting firecrackers.  Darn, the Lunar New Year just passed.  Hmm... I think I have to wait until Canada Day.

Monday, January 23, 2012

Sound trigger for high speed flash photography, part 5

So, it's easier said than done.  My balloon pop test shows that my circuit is too slow or that sound does not travel fast enough--the microphone was positioned about 2.5 metres away.  The flash gun was positioned about a metre away.

Let's see.  Sound travels at 340 m/s.  To cover a distance of 2.5m, it would take 0.0074s or 7.4 ms.  Maybe the balloon collapses faster than that?

Well, I just wasted one blue balloon.  Fourteen more to go.

Blue balloon pop

Sunday, January 22, 2012

Sound trigger for high speed flash photography, part 4

My fingers were itchy.  I wanted to find out how good the sound trigger really is.  My first attempt with the flash gun did not work too well.  The flash fires off only with a really loud hand clap or an air blow onto the electret microphone.  I had to replace the PN2222A transistor I used with the OptoIsolator I used with the laser trigger circuit--it looks like, although I am not sure why, the Base of the PN2222A may need to be driven by at least 3.8 volts or higher current but the circuit could muster only 2.5 volts or so and about 3 mA, but about 2.5 volts is enough to activate the OptoIsolator.  With the OptoIsolator, a finger snap can trigger the flash gun to fire.  After I got the flash to fire, it was time to look for some target to shoot.

I remember seeing a couple of bags of balloons at my place a few years ago but cannot find them anymore.  Perhaps they were used up for weddings and birthday parties.  Balloons would be really cool I think, but there was none around.  I had nothing cool to test the sound trigger with.  I decided to test with a marble and a column of Mega Blok blocks.  I am unimpressed with the capture but it shows how good the sound trigger worked.

The marble hits the column of Mega Bloks pretty hard--I used to play with marbles and a flicker of the thumb sends the marble off pretty fast and hard.  One can see in the photo below where the column broke and how the top half stayed fixed while the bottom half started to move by a millimeter or so.  So, the sound trigger worked quite well.

Marble and Mega Bloks

I think the Dollar Store sells those balloons.  If I have time tomorrow, I will grab a few balloons to try out.

Saturday, January 21, 2012

Laser trigger for high speed flash photography, post-final

I adjusted the circuit a tiny bit. I added an LED and another potentiometer after ORgate1.  This works really well.  The additional 1 KOhm potentiometer allows for fine tuning of the resistance (and therefore the trigger delay).  The LED prevents current from the DelayCapacitor when it discharges (when the circuit gets reset) from flowing back towards ORgate1.  A regular diode should really be used instead of an LED as voltage drops significantly across an LED (but for my purpose, the LED works and I do not have any regular diode around.)


Description:
  • CircuitResetSwitch:  when the switch is closed, it will cause the DelayCapacitor to discharge quickly to ground, and it will cause XOR_OnOff to output a zero voltage.  The CircuitResetSwitch is implemented with a MOM (momentary) switch.
  • OptoIsolator:  triggers the flash to pop when a trigger voltage is reached, and protects the circuit from a possibly high current from the flash.
  • PhotoResistor:  when a strong source of light (i.e. the laser) hits it, its resistance goes down to 10 Ohms, directing most current to ground.  If the source of light is broken, its resistance goes up to 1 MOhm, directing most current to ORgate1.
Actual implementation:

Breadboard, laser pointer, and lego water dispenser

Components on breadboard

Breadboard on another angle

Breadboard from another angle

Water bodies, part 4

I could not capture a water crown so the next best would be a Budweiser.  I think their commercial has a upside down cap on top of the bottle.

Evaporation

Boring

Group shot

Fist

Single

Waste

Red blob

Peek-a-boo


Thinker
Shark fin

Fizzle

Yum

Dance

Planets in orbit

Refreshing

Grow

Tipped

Explosion

Friday, January 20, 2012

Water bodies, part 3

My next attempts were to capture a water crown but so far no go.  Perhaps I need some liquid with higher density?

What I got yesterday were still similar to the other shots I have already taken:

Maybe the formation of a crown?

Planet and vortex

UFO


Cone


Bean


Another formation of a crown?

Wednesday, January 18, 2012

Water bodies, part 2

So, I did decide to go back to using my laser setup.  This time around, there were two things I did differently than the last shoot.  For one, I am operating in relatively bright room light, and second, I built a Lego (well, I am using Mega Bloks actually) bridge with a water dispensing head (see below).  The light allows me to see what the heck I am doing and the bridge focuses the water drop in one location so I can break the laser beam most of the time.

Anyhow, I am satisfied that the laser setup works well.  Here are some more photos:

Standard finger

Volcano

Weird slanted projection

Weird crook

Another finger

Tower

My setup with the Lego bridge with the water dispenser, the laser pointer powered by 3 AAA batteries housed inside a digital alarm clock, the laser trigger circuit, and the SB-25 flash gun.

Invasion of What?

What are these bugs? I've never seen them before. I saw them at my parents' place the other day. Lots of them in soil or grassy areas.